Do you have land, a space that needs intervention, a project that requires a new approach?
Get in touch - I love listening to ideas and developing them together.
1. Weed killer (natural method: vinegar with high acetic acid content + dishwashing detergent) and weed mat (if desired).
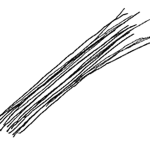
2. Freshly cut willow branches or cuttings
3. Rope or plastic cable ties (I personally don't recommend plastic)

4. Hedge shears
5. A spike or old screwdriver for drilling planting holes
Mark the shape you plan to make on the ground. You can make a fence, a tunnel, or a dome. If you are making a dome, it is easiest to stick a stake in the middle, tie a rope, and circle it while pouring flour. In this way, a white mark in the shape of a circle will remain on the ground.
Clear grass and weeds from the planting area and stake a weed control pad if you use it, or if not, put a thick mulch around the base of the structure after you finish planting. Willow will have a better chance of establishing well if it does not have to compete with other plants.

Use a spike to make a hole for planting, cut the base of the willow diagonally, and push the stick about 30 cm into the ground.
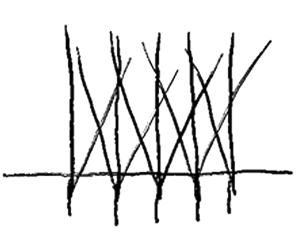
If you are making a dome or tunnel, you will need to place long sticks (poles) so that they point straight up. Spacing will depend on the length of the sticks and the size of the structure you are making, but a distance of about 25-30 cm between them is usually a good distance.
Too far apart and the structure will be void, too close together and the plants will compete with each other as they grow. The posts must be able to overlap and cross with the posts on the opposite side.


Make another hole on one side of the stand and insert one of your weaving rods at about a 45-degree angle. Do the same on the other side of the upright, but this time tilt the bar in the other direction.
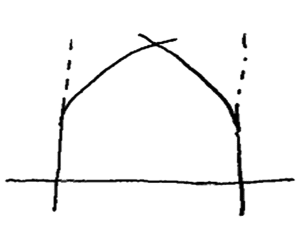
Bend long posts to form the top of a tunnel or dome. Ideally, they should swing around the other upright on the other side. The length of the columns will determine the height of your structure (unless you are patient and wait for the columns to grow until next year before you build the roof). You can tie the willow loosely with a string to hold the structure together.
Now weave in the secondary rods at an angle, keeping them angled and weaving under, over, under, over, etc. Again, it can help to tie the willow where it crosses, especially when you start weaving. As more pieces are woven in, the structure should begin to hold.
Over time, the willow can be grafted in places where it crosses.
Put a thick layer of bark chips or other mulch around the base of the willow to retain moisture and prevent weed growth (you don’t have to if you used a weed mat). You will have to water it well during the first year until its roots are established (but you don’t have to if you installed irrigation).
If some of the poles become alive, you can remove them and replace them with new poles next year.

Rabbits and deer like to eat young willow, so you may need to fence off your structure while it’s unbranched. Aphids also enjoy willow, which can lead to a sticky honeydew produced by aphids that can also attract wasps.
Keeping willow netting open, with gaps, will help air flow and let predatory insects like ladybugs control aphids. Your willow will grow fast! So, you’ll have to trim it a few times a year to keep it looking neat, or let it grow and give it a good trim in the winter (you can also use the willow branches you cut off for other future projects).
Branches growing on the sides of the structure can be woven in to thicken the sides and top. These can be woven in random patterns into existing weaves.